Remember being a kid and putting a stormtrooper in a dump truck to haul a bunch of unicorns to a concert? Or putting a stuffed monkey on a submarine and going off on the best adventure ever? At least until the next day?
Well, while PicMonkey doesn’t have a submarine (yet), we love the idea of putting stuff together and doing anything to anything. Pretty much whatever you can do to a graphic in PicMonkey, for example, you can do to a font. The Sculpt effect you used to beef up the pic of your dog’s biceps? That’ll work on text, too. And the sunset pic that “doesn’t do it justice?” You can enhance the reds with Lip Tint.
Wanna see how we do it? Let’s put some mermaids and dinosaurs together and see what happens.
Textures on text
PicMonkey has a coupla hundred fonts, and they’re pretty great as-is, but you can get more mileage out of them by adding textures.

Choose your font, enter your text, and place it where you want it on your design. Looks good. Now go to the Textures tab and select a texture, like Watercolor. Choose the Blend, Saturation, and Fade to get the look you want. Pretty cool, yeah? Want to be cooler? Of course you do.
Select the text box you just added the texture to, and slide the Fade up to 100%. The texture will disappear, but you’re going to bring it back with the brush. Click the brush icon above the Watercolor samples. In the Erase & Brush palette that appears, click the brush icon. Now slide the Fade way down on your Watercolor. This is what makes the texture “brushable.” Choose a fairly small brush size on the Erase and Brush palette and brush over your text. The Watercolor texture will appear where you brush it. You can create some fabulous effects by letting some of the font color peek through the texture.
Lip tint on jackets, skies, and ice cream cones
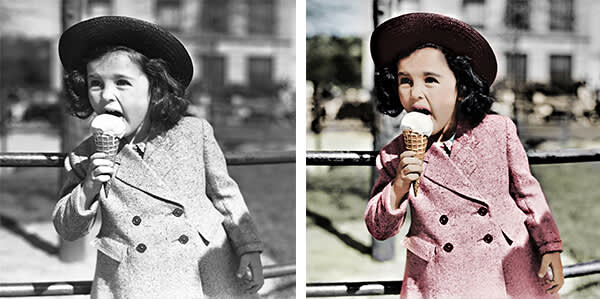
Black and white photos are cool and arty and historical. Full stop. That said, color can look pretty groovy. Adding color to a black and white photo takes some practice, but the results can be surprising. In a good way. Not like 80s classic movie colorization.

Use the Touch Up tools to add color to people in B&W photos. Use Spray Tan on skin, and brighten eyes and lips with our eye and lip tools. Use Highlight on the hair, and there you go. As you’re working, remember to adjust your sliders, like Hardness, Strength, Intensity, etc. They’re essential for creating natural looks. So unless you’re colorizing pics of clowns, keep those in mind.
That all seems pretty straight-forward, though, touching up faces with color. How is that doing anything to anything? Well, how about by using Lip Tint to pink up that jacket, make the grass green and the sky blue? That’s how.
Pro tip: When using any type of brush tool to add effects, work in small areas, making short strokes frequently. If you make a mistake and need to undo, you won’t be undoing all of the brushing you’ve done.
Touch up on fonts—What? Yes!

Remember mere moments ago when we described how to add a texture to a font, and then we went into Touch Up tools? Sure you do. So you can guess where we’re going now — using Touch Up tools on fonts. Anything to anything, remember? So how about using Lip Tint on some fonts?
One caveat for this one is that you have to use a base font color other than white or black. Other than that, anything goes.
Let’s look at using Lip Tint on text. This technique works best with lighter font colors.
Type, size, and place the text. Then go to the Touch Up tab and select Lip Tint. Brush over the font as you did when applying the Watercolor texture, again adjusting the sliders. Once you’ve brushed some of one color and it looks pretty good, click Apply. Then do the same with another color. You can even change tint colors using the color picker.
Textures on photos

Adding textures to photos is an easy way to add a bit of flare as well as drawing eyes toward specific elements in your pic. It also can tie a pic to other elements in a design, as the foil in the Polaroid matches the foil in the painterly brush strokes in the image above.
To add a texture to a photo, open a photo, and then go to the Textures tab. Select one of the textures— glitters and foils are generally considered the most fabulous. The first thing you’ll notice is that the texture is applied to your entire pic. Probably not the look you’re going for. So it’s time to get creative, play with the fade, and erase it off artfully.
Click the Brush icon in the upper-right corner of the glitter (or whatever texture you’ve got) controls in the panel. On the Erase & Brush palette, select the Eraser tab. Adjust the sliders, and brush over your pic. You’ll see the texture disappear wherever you brush. When you’ve erased all of the texture you don’t need, adjust the Saturation and Fade sliders to complete the look.
To learn how to get a photo or texture to appear through the outline of a shape (like the photos peek through the Polaroid frames and the marble peeks through the brush stroke shape in the image above), take a look at Everything You Gotta Know About Clipping Masks in New PicMonkey.
Giddy up!
Now that you know we really mean it when we say, “Do anything to anything,” get going! Just like putting pickles with peanut butter or having a parrot sing in a metal band, you’ll find the mix that works best for you.
